
LESSON 2 – Introduction to programming with micro:bit
Lesson Objectives
- Introduction to python programming with micro:bit
Success Criteria
- must create programs using the Python programming language with micro:bit
- should learn program solving skills to write an algorithm for the micro:bit
- could demonstrate program solving skills to solve a problem
Keywords
- Algorithm
- Python editor
- Blockly
- Plot
Commands
- while :
- show
- scroll
- sleep(2000)
Starter
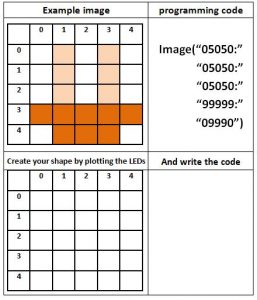
Make your own image to display on micro:bit
On micro:bit each LED represents 1 pixel. Before, we shaded the each led to create and image. Today we will be plotting each led representing with numbers (from 0 to 9 represents brightness off the lights) to create an image.
Each LED value can be set to one of ten values. If a pixel is set to 0 (zero) then it’s off (no light). However, if it is set to 9 then it is at its brightest level. The values 1 to 8 represent the brightness levels between off (0) and full on (9).
Programming languages
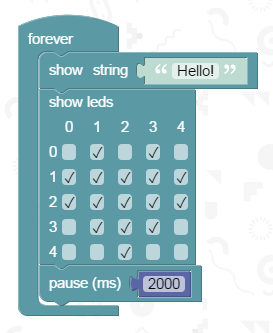
Up until now we have used block coding with micro:bit, which is a visual programming language. Block programming is the basic programming language to use but in real life we use text base programming languages. Such as Python which we will be looking at it today. Instead of blocks we use text commands, in real life programming that is what you will be using: text based languages to create computer programs. This is because text based languages are much quicker to create programs in.
As I mentioned earlier we are going to use programming language called Python with the Microbit. In this lesson I will introduce Python to you and how you can use it with the Microbit.
Click here to open the MicroPython editor
Open the MicroPython editor by clicking the link above. This will load a demo program which looks like this:
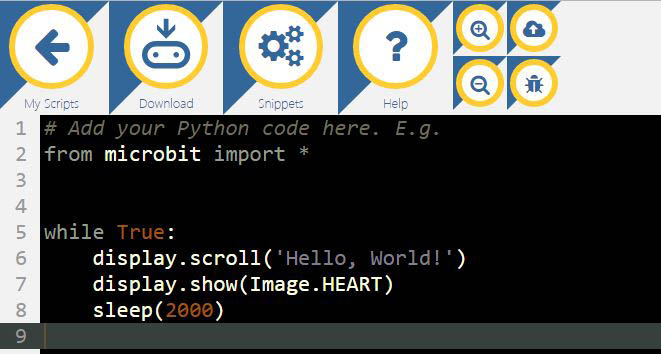
It is a Python code but exactly same like this one:
Lets have a look at what all those lines of code mean
from microbit import *
This is we have to have it in all our micro:bit programs. It means we are telling computer we are using Python micro:bit code library module.
while True:
While is a loop in programming we call it iteration which is repeating events
display.scroll(‘Hello, World!’)
Displays scrolling text “Hello World” on your on micro:bit. Later, instead of Hello World write your name and see what happens on your micro:bit.
display.show(Image.HEART)
Shows built-in heart shape on your micro:bit.
sleep(2000)
This tells the Microbit to wait for 2000 milliseconds. 2000 milliseconds are 2 seconds. What would happen if this line wasn’t in the program?
Task 1 – Practising simple Python shapes with micro:bit
As mentioned before Python has lots of built-in micro:bit images – using the list below, modify the program on your microPython editor by replacing heart shape code with one of the follwing codes:
Image.HAPPY
Image.SMILE
Image.SAD
Image.CONFUSED
Image.ANGRY
Image.ASLEEP
Image.SURPRISED
Image.SILLY
Image.FABULOUS
Image.MEH
Image.YES
Image.NO
Image.CLOCK12, Image.CLOCK11, Image.CLOCK10, Image.CLOCK9, Image.CLOCK8, Image.CLOCK7,Image.CLOCK6, Image.CLOCK5, Image.CLOCK4, Image.CLOCK3, Image.CLOCK2, Image.CLOCK1
Image.ARROW_N, Image.ARROW_NE, Image.ARROW_E, Image.ARROW_SE, Image.ARROW_S, Image.ARROW_SW,Image.ARROW_W, Image.ARROW_NW
Image.TRIANGLE
Image.TRIANGLE_LEFT
Image.CHESSBOARD
Image.DIAMOND
Image.DIAMOND_SMALL
Image.SQUARE
Image.SQUARE_SMALL
Image.RABBIT
Image.COW
Image.MUSIC_CROTCHET
Image.MUSIC_QUAVER
Image.MUSIC_QUAVERS
Image.PITCHFORK
Image.XMAS
Image.TARGET
Image.TSHIRT
Image.ROLLERSKATE
Image.DUCK
Image.HOUSE
Image.TORTOISE
Image.BUTTERFLY
Image.STICKFIGURE
Image.GHOST
Image.SWORD
Image.GIRAFFE
Image.SKULL
Image.UMBRELLA
Image.SNAKE
For downloading your code to your micro:bit follow my on screen instructions.
-
On your microPython editor on the top click “Download”
- At the bottom of your screen you will see file downloaded
- Click on the arrow icon next to do file
- Then select “Always open files of this type”
- Open with Notepad and save it in your area
- Copy your script and place into or drag and drop it on your micro:bit
- Your micro:bit should start flashing. Do not touch it until its finish flashing
- Once it’s complete you should see your micro:bit showing your shape
Well done! You have finished your first python program. In your book explain differences between the block coding and the text base coding?
Task 2 – Create custom image using microPython editor
Earlier you have created an image plotting LEDs in your starter activity. In this task we are going to create that image on your micro:bit
Delete everything on your microPython screen except from microbit import *
then write below code but in image code use your own code which you have done it in starter activity
if you haven done it in your starter use the below code.
from microbit import *
boat = Image(“05050:”
“05050:”
“05050:”
“99999:”
“09990”)
display.show(boat)
Task 3 – Creating an animation!
Animating sinking ship
To be able to animate in MicroPython we have to have more than one images and have them in a list.
MicroPython have built in lists of images that we can test Image.ALL_CLOCKS one of them.
from microbit import *
display.show(Image.ALL_CLOCKS, loop=True, delay=2000)
And here is my sinking ship animation code
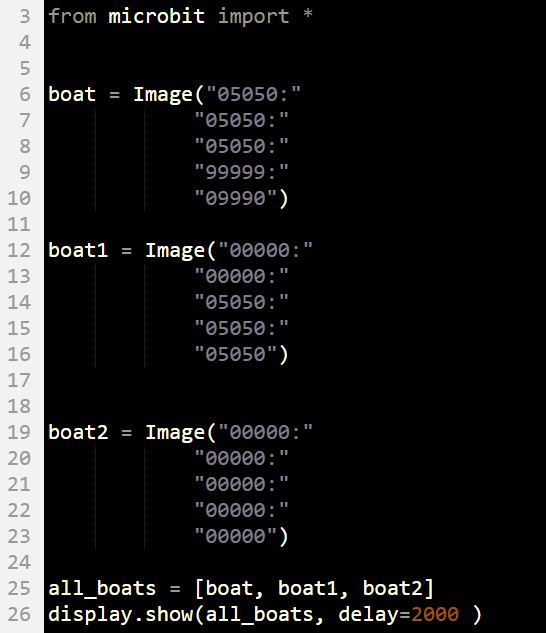
Why do you think I did not use loop=True?
Now it is your turn to create your own animation.
Task 4 – Further challenges
Using buttons to create different events
Using buttons
Home learning – due in next lesson
You have successfully tracked and displayed the number of wins on the BBC micro:bit! However, what about losses? Use the Game drawer to change score by -1 when button B is pressed.
Run and compile the code to see if it works as expected.
You can also find this homework in your Show My Homework account.
Use the below links to help you with your task
Computational Thinking
About micro:bit
This lesson based micro:bit lesson on this link courtesy of Bellper Computing Faculty